Halloween is the perfect excuse to get creative with food, and nothing sets the mood quite like a Scare-Cuterie Board. It’s a spooky twist on the classic charcuterie spread, filled with cheeses, meats, fruits, and snacks styled to look eerie and fun. Think ghost-shaped cheese slices, “eyeball” grapes, or crackers stacked like little tombstones—your guests will love the mix of flavors and the playful Halloween look.
This board isn’t just about eating; it’s about creating an experience. It works for family nights, Halloween parties, or even as a centerpiece for trick-or-treat gatherings. The best part is its flexibility—swap in turkey, chicken, or plant-based deli slices instead of pork, and you’ll have something everyone can enjoy. With simple tricks, you can turn everyday foods into a spooky masterpiece that looks impressive but is easy to make.
Why You’ll Love This Scare-Cuterie Board
A Scare-Cuterie Board is more than food—it’s a conversation piece. Guests naturally gather around it, pointing out the creative “creepy” touches while enjoying a variety of bites. It’s playful enough for kids yet stylish enough for adults.
You’ll also love how customizable it is. Use turkey pepperoni, sliced chicken, or vegetarian options in place of traditional meats, and mix in cheeses, crackers, fruits, and veggies. Arrange everything with a Halloween flair—like olives as eyeballs or carrot sticks as “witch fingers.”
Best of all, it’s quick to assemble and requires no cooking skills. In just a little time, you’ll have a spread that looks like it came straight off Pinterest, but without the stress. It’s festive, flexible, and guaranteed to impress.
What You’ll Need
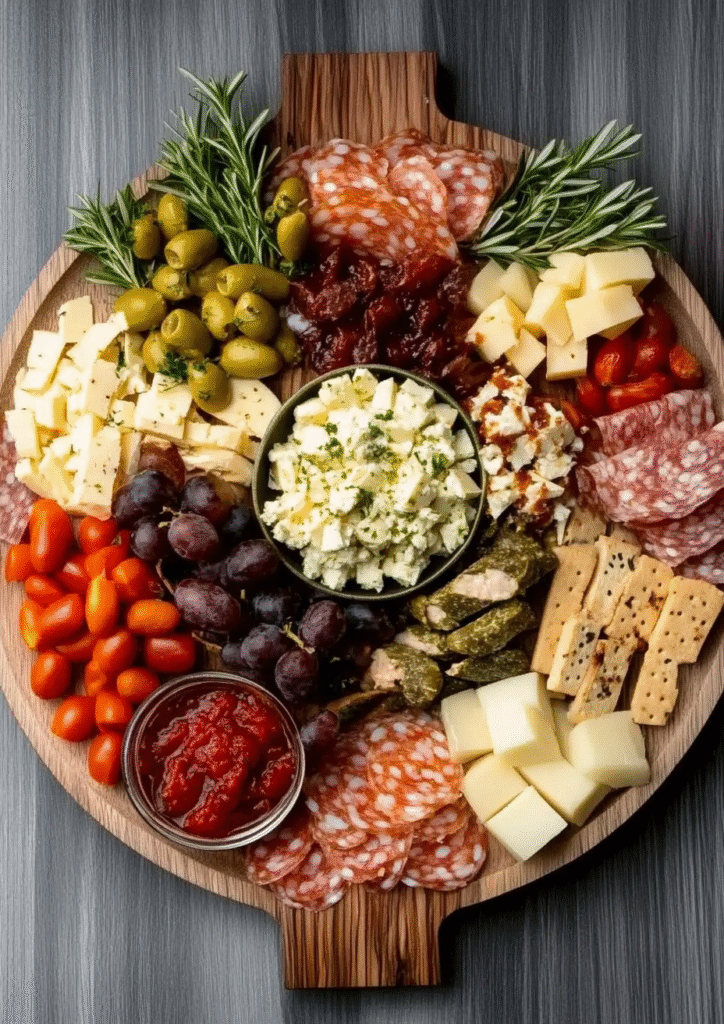
To build your Scare-Cuterie Board, you’ll need a mix of proteins, cheeses, fruits, veggies, and some fun extras for that spooky touch. Here’s a great starter list:
- Cheeses: Cheddar, mozzarella, Colby Jack, and cream cheese (use cookie cutters to shape ghosts, bats, or pumpkins).
- Meats: Turkey pepperoni, sliced chicken, or beef deli cuts (arrange in roses or roll-ups).
- Crackers & Bread: Assorted crackers, breadsticks, and pita chips (great for “tombstones” or “witch fingers”).
- Fruits & Veggies: Grapes (eyeballs), cherry tomatoes (bloody bites), carrot sticks, celery, olives, blackberries.
- Dips & Spreads: Hummus, guacamole, or ranch (perfect for cauldron-like dips).
- Extras: Candy eyeballs, plastic spiders, or Halloween-themed picks for décor.
You don’t need everything on this list—just mix and match items you enjoy. The key is variety in flavors, colors, and textures so the board feels full and festive.
How to Make Scare-Cuterie Board
Here’s a simple guide to assembling a Scare-Cuterie Board for about 6–8 people:
- 6 oz cheddar cheese, cut into ghost or pumpkin shapes
- 6 oz mozzarella balls (draw “eyes” with edible marker or food coloring)
- 8 oz turkey pepperoni or sliced chicken, rolled into spirals
- 1 cup assorted crackers
- 1 cup breadsticks or pita chips
- 1 cup grapes (green or red), halved for “eyeballs”
- 1 cup cherry tomatoes
- 1 cup carrot sticks and celery
- ½ cup olives (black or green for spooky effect)
- ½ cup hummus or guacamole (serve in a small “cauldron” bowl)
- Optional candy eyeballs or fun Halloween decorations
Steps:
- Start with your largest items like cheese and meats. Place them evenly around the board.
- Add crackers and bread to fill gaps, arranging them in stacks or “graveyard rows.”
- Layer fruits and veggies next, grouping by color for a bold effect.
- Add dips in small bowls—think bubbling cauldron or slime effect.
- Finish with spooky garnishes like candy eyeballs, fake spiders, or themed picks.
With just a little arranging, your board will go from ordinary snacks to a centerpiece that steals the show
You Must Know
A great Scare-Cuterie Board is all about balance and presentation. Mix savory, sweet, crunchy, and creamy so every guest finds something they love. Don’t overload on just cheese or crackers—variety keeps it exciting.
Presentation is key for Halloween. Use cookie cutters for ghost-shaped cheese, place dark fruits next to bright orange snacks for contrast, and scatter in little spooky details like candy eyeballs or toy spiders. It doesn’t need to be expensive—most items are easy to find at your local store.
Finally, think about your guests. For kids, stick to mild flavors like mozzarella or simple crackers. For adults, add bold cheeses or spicy turkey pepperoni. Tailoring your board makes it both fun and crowd-pleasing.
Perfecting the Cooking Process
There’s no real “cooking” here—it’s all about smart assembly. Start with larger items like cheeses, meats, and dip bowls, then fill gaps with crackers, fruits, and veggies.
Spread out your colors for balance—don’t put all the orange cheeses or dark olives in one spot. This makes the board pop visually. Keep everything chilled until serving, especially meats and cheeses.
Lastly, add spooky touches at the very end. Place gummy worms, candy eyeballs, or little Halloween props right before serving so they stay fresh and fun. These small details are what turn a snack tray into a Halloween masterpiece.
Add Your Touch Scare-Cuterie Board
What makes a Scare-Cuterie Board special is the personal twist you bring. Maybe you carve ghost faces into cheese, shape guacamole into a bubbling cauldron, or create “monster mouths” with apple slices and peanut butter. Use what you love—seasonal fruits, your favorite cheeses, or even homemade dips.
You can also theme the board to your party. Hosting a kid-friendly night? Add fun shapes, colorful candies, and easy-to-grab snacks. Planning an adults-only gathering? Go bold with sharper cheeses, spicy turkey pepperoni, and gourmet crackers. Small details like black napkins, Halloween picks, or even arranging items in the shape of a pumpkin or skull can make your board unforgettable.
Storing & Reheating
If you have leftovers, don’t worry—a Scare-Cuterie Board stores well. Wrap cheeses and meats tightly in plastic wrap or keep them in airtight containers in the fridge for up to 3 days. Crackers and breadsticks should be stored separately to keep them crunchy.
Get inspired with this delicious recipe.
Fruits and veggies can be refrigerated, but keep in mind some, like grapes or tomatoes, may lose freshness after a day or two. Dips like hummus or guacamole are best eaten within 1–2 days.
Since most items are served cold, reheating isn’t necessary—just refresh the board by adding fresh crackers or fruit when serving leftovers.
Chef’s Helpful Tips for Scare-Cuterie Board
Hungry for more? Try this next.
- Plan your layout first: Place bowls for dips on the board before anything else. Build around them so the arrangement looks balanced.
- Use height and layers: Stack crackers, fold meats into rolls, and pile grapes to give the board dimension. Flat boards can look boring.
- Think color contrast: Pair bright orange cheese with dark olives or purple grapes to create that spooky Halloween pop.
- Keep it bite-sized: Cut cheeses into small shapes, slice fruits, and keep meats in easy portions so guests don’t need knives.
- Add décor sparingly: A few fake spiders or webbing is fun, but don’t overdo it—food should stay safe and easy to eat.
These little tricks make your Scare-Cuterie Board look polished and party-ready with minimal effort.
FAQ for Scare-Cuterie Board
Can I make this ahead of time?
Yes! Assemble it up to 4 hours before serving, cover with plastic wrap, and refrigerate. Add final spooky touches right before serving.
What if I don’t eat meat?
Go vegetarian with cheeses, nuts, roasted veggies, and plant-based deli slices. It’ll be just as fun and delicious.
Try another quick and easy recipe here.
What cheeses work best?
Cheddar, mozzarella, Colby Jack, and brie all work great. Mix hard and soft cheeses for variety.
How do I serve dips without a mess?
Use small bowls or ramekins. Bonus points if you use a black bowl for a “cauldron” effect.
Can kids help make it?
Absolutely! Kids love helping cut cheese shapes, place candy eyeballs, or arrange grapes as “eyeballs.” It’s a fun family activity.
Conclusion
A Scare-Cuterie Board is the ultimate way to set the Halloween mood—it’s festive, fun, and delicious all at once. With just a little creativity, you can turn simple cheeses, meats, fruits, and snacks into a spooky centerpiece that gets everyone talking. The best part? It’s completely customizable. Whether you go bold and eerie for adults or playful and colorful for kids, this board adapts to your crowd.
It doesn’t take a chef’s skill to pull off, either. By mixing textures, adding color contrast, and finishing with a few creepy-cute touches, your board will look like it belongs in a magazine spread. Plus, it’s stress-free—easy to prep ahead, simple to store leftovers, and fun for guests to explore throughout the party.
So this Halloween, skip the complicated recipes and let your creativity shine through a Scare-Cuterie Board. It’s more than just snacks—it’s an edible experience that brings people together and adds that perfect spooky flair to your celebration. 🎃🧀

Fun and Festive: How to Make a Halloween Scare-Cuterie Board
Description
Make your Halloween party unforgettable with a spooky Scare-Cuterie Board! Packed with cheeses, turkey slices, fruits, veggies, and creepy touches, it’s both fun and delicious. Perfect for kids, adults, or any Halloween gathering.
Ingredients
Instructions
Arrange bowls for dips on your serving board first.
Place cheese and meats around the dips, folding or rolling for dimension.
Fill gaps with crackers, breadsticks, and veggies.
Add grapes, olives, and cherry tomatoes for a spooky pop of color.
Finish with candy eyes, toy spiders, or Halloween picks just before serving.
Serve immediately and let guests enjoy the spooky spread!
Notes
- Swap turkey pepperoni for plant-based deli slices for a vegetarian option.
Use cookie cutters to create fun shapes from cheese or fruits.
Store leftovers in airtight containers in the fridge for up to 3 days; add fresh crackers before serving.